-
![]()
Daisy
Daisy is the Senior editor of the writing team for EaseUS. She has been working in EaseUS for over ten years, starting from a technical writer to a team leader of the content group. As a professional author for over 10 years, she writes a lot to help people overcome their tech troubles.…Read full bio -
Jane is an experienced editor for EaseUS focused on tech blog writing. Familiar with all kinds of video editing and screen recording software on the market, she specializes in composing posts about recording and editing videos. All the topics she chooses …Read full bio
-
![]()
Alin
Alin is an experienced technical blog writing editor. She knows the information about screen recording software on the market, and is also familiar with data cloning and data backup software. She is expert in writing posts about these products, aiming at providing users with effective solutions.…Read full bio -
Jean is recognized as one of the most professional writers in EaseUS. She has kept improving her writing skills over the past 10 years and helped millions of her readers solve their tech problems on PC, Mac, and iOS devices.…Read full bio
-
![]()
Jerry
Jerry is a fan of science and technology, aiming to make readers' tech life easy and enjoyable. He loves exploring new technologies and writing technical how-to tips. All the topics he chooses aim to offer users more instructive information.…Read full bio -
![]()
Rel
Rel has always maintained a strong curiosity about the computer field and is committed to the research of the most efficient and practical computer problem solutions.…Read full bio -
![]()
Gemma
Gemma is member of EaseUS team and has been committed to creating valuable content in fields about file recovery, partition management, and data backup etc. for many years. She loves to help users solve various types of computer related issues.…Read full bio -
![]()
Shelly
"I hope my articles can help solve your technical problems. If you are interested in other articles, you can check the articles at the bottom of this page. Similarly, you can also check my Twitter to get additional help."…Read full bio
Page Table of Contents
Jane Zhou
Updated on Jun 09, 2026
0 Views |
0 min read
💡Quick Answer
- EaseUS RecExperts: The easiest way to record a Twitch stream with audio, auto-scheduler & high resolution.
- OBS Studio: A pro-level tool to capture Twitch gameplay and live videos with full customization.
- Twitch VOD: Native saving option for your own streams; it doesn't work for others' live videos.
- VLC Media Player: Grab live Twitch streams via URL and save them as video files; it doesn't offer editing or audio tweaks.
Twitch, one of the biggest game streaming platforms, offers ephemeral live streams. Whether you want to save your own streams to share or collect highlights from your favorite streamers, recording live streams is essential. However, Twitch's built-in VOD (Video on Demand) feature has significant limitations in terms of saving duration, audio integrity, and control.
This article details feasible methods for recording Twitch streams, helping you reliably save live stream content locally for later viewing, editing, or archiving.
How to Record Twitch Streams Automatically
😊Best for: Twitch Viewers and streamers who want HD stream recording with webcam, audio, scheduler, and no watermark.
EaseUS RecExperts is one of the most popular Twitch stream recorders for Windows and Mac users. It can smoothly and automatically record live Twitch streams with minimal CPU or GPU resource usage, and without a watermark or time limit. You can choose to capture full or partial screens on Twitch. Moreover, this video capture software enables you to capture streaming videos from other streaming sites with one click.
It supports high-resolution Twitch capture with system sound, microphone, webcam overlay, scheduled tasks, and video editing. It can also save streaming video and audio files separately, making it ideal for creators who want to edit and publish to platforms like YouTube.
👍Why We Recommend:
- No learning curve – clean interface
- Record in 4K with flexible output formats like MP4, MOV, and AVI
- Schedule recordings feature to capture Twitch streams automatically
- Internal and external audio recording at the same time on Mac/Windows PC
- Auto-stop & auto-split features
- Built-in trim and editing capabilities
🚩Steps on How to Record Twitch Streams as a viewer or streamer with EaseUS Stream Recorder:
Step 1. Create a Timed Recording Task
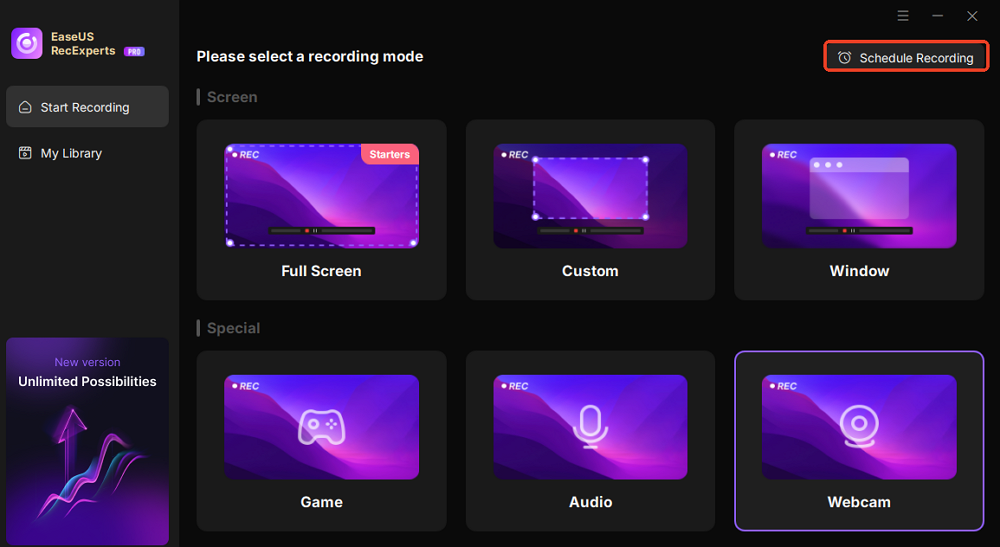
Download and launch the EaseUS screen recorder on your Windows or Mac PCs. Then, click the Schedule Recording button in the upper right corner of the main interface.
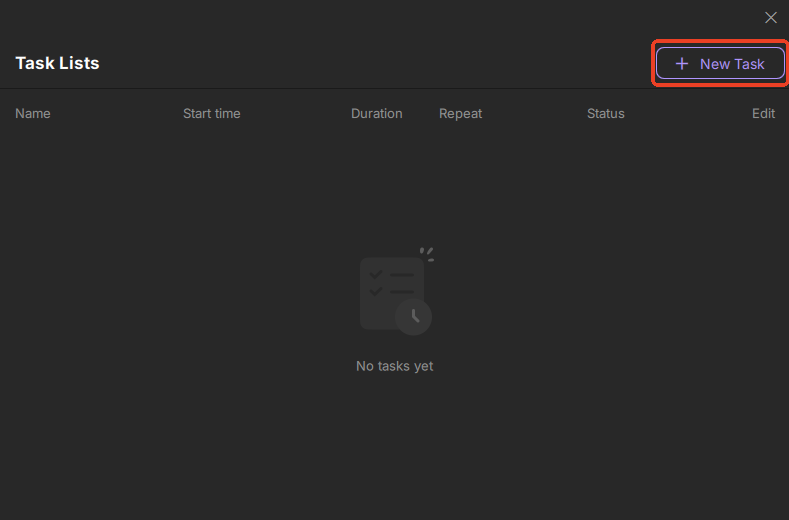
Then, select the New Task option to add a new schedule for the program.
Step 2. Configure the Scheduled Recording Task
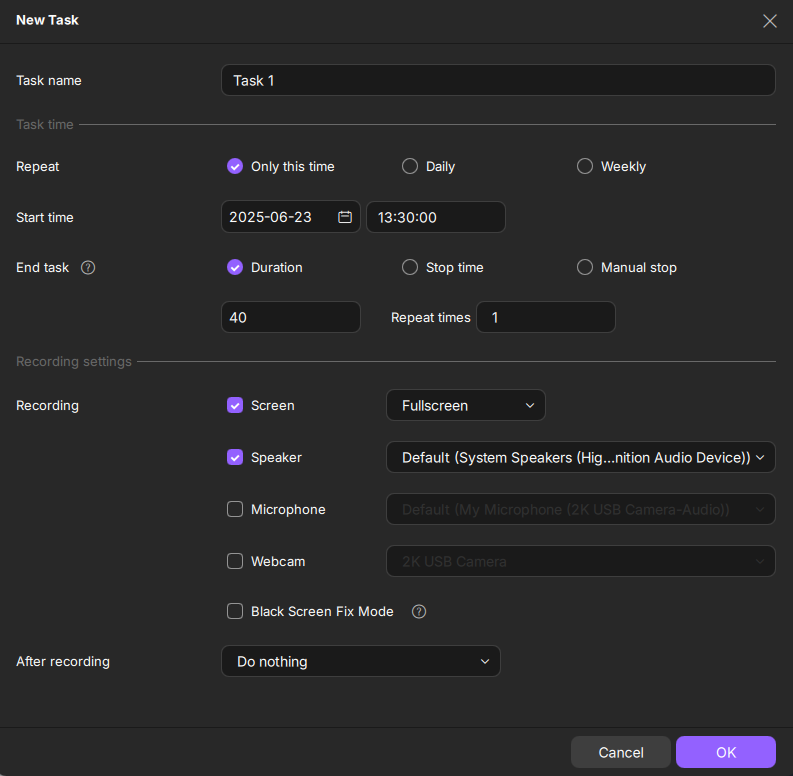
Next, you need to set the relevant information for your scheduled task.
- Name your recording task in the Task name tab.
- In the Task time tab, choose repeat time and specify the recording start and end time.
- In the Recording setting tab, select the recording area, choose the audio input, webcam setting, or choose black screen fix mode. Plus, you can choose to exit the program, sleep/shut down the computer, or do nothing after recording. Then, hit the OK button.
Step 3. Edit or Delete a Scheduled Recording
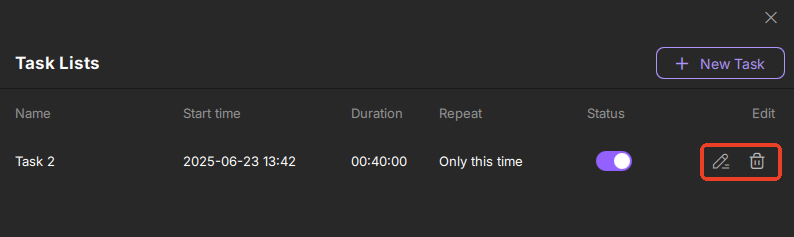
If you need to change the scheduled recording time or other settings, click the Edit button. If you need to delete the schedule, click the Delete icon.
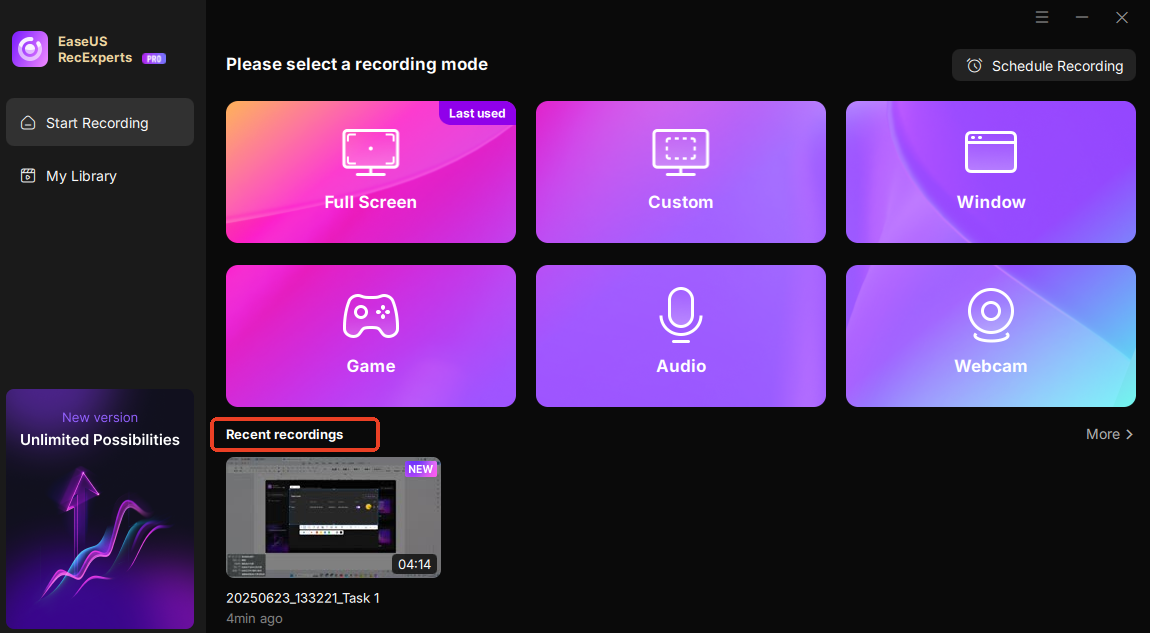
Step 4. View Your Scheduled Screen Recordings
When the recording start time you set comes, the software will screen record and save the recording video file automatically. You can view this file by clicking the recorded video in the Recent recordings tab.
Don't forget to share this tutorial if you find it helpful!

How to Record a Twitch Stream with OBS
😊Best for: Advanced users who want professional Twitch recording and streaming in one tool.
OBS Studio is an open source screen recorder and is ideal for recording live gameplay, tutorials, and Twitch streams. You can create custom scenes, mix audio/video sources, and export high-quality files. This is helpful to record streaming video on Twitch, Discord, YouTube, etc.
Editor's review
![]() Pros
Pros
- Completely free & open-source
- Unlimited recording length
- Advanced bitrate/resolution/audio options
- Can record multiple inputs at once (screen + mic + cam)
![]() Cons
Cons
- Steeper learning curve
- Requires manual setup
- No built-in editing tools
🚩 How to Use OBS to Record and Save Your Favourite Streams:
Step 1. Download, install, and run OBS on your Windows, Mac, or Linux device.
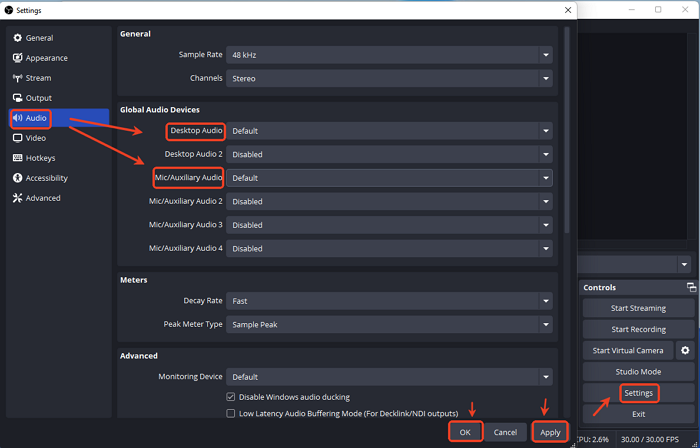
Step 2. Go to Settings. You can configure output format, storage path, fps, and more options here.
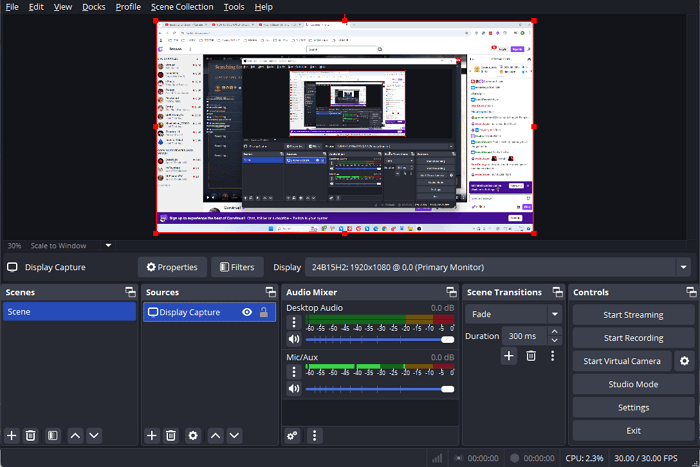
Step 3. Move back to the main OBS Studio window and click + under the Sources tab. Select Display Capture > OK > choose Display you want to capture > OK.

Step 4. Once done, click the Start Recording button to capture Twitch streams on your screen. When you have finished recording, hit the Stop Recording button, and the recording will be saved on your computer.
- Read also: Best OBS Settings for Streaming on Twitch
Don't forget to share this tutorial if you find it helpful!
How to Save Live Streams on Twitch with VOD
😊Best for: Twitch Broadcaster who wants to save Twitch broadcasts (your own only) for later download or clip editing.
Can you record Twitch streams automatically? Yes! VOD, also known as "Video On Demand," is an option that Twitch provides for streamers to save parts of their streams in storage so that both they and their fans can easily access those highlights later. Twitch's built-in VOD system allows you to automatically save past broadcasts for 7 (regular streamers), 14 (Affiliates), or 60 days (Partners, Turbo, and Prime users), depending on account type. You can download or clip these later from the dashboard.
However, please note that when using VOD, segments containing copyrighted music will be automatically muted, and the quality may not be high. The following is a comparison of the VOD functions of different devices:
|
Device |
Support |
Play VOD |
Download VOD |
One-liner |
|
Windows/macOS/Linux PC |
✅ |
✅ |
✅ |
Visit the Twitch website for full functionality. |
|
Phone/tablet |
✅ |
✅ |
❌ |
Need extra app like VLC to download |
|
TV/console |
❌ |
❌ |
❌ |
Use |
Editor's review
![]() Pros
Pros
- No software needed
- Native integration
- Enable clip creation for highlights
![]() Cons
Cons
- Only works for your own streams
- Limited time (7-60 days) before expiration
- No editing or scheduling options
🚩How to Record Twitch Your Streams with Built-in VOD Features:
Step 1. On your computer, visit Twitch's official website and log in to your account.
- Tip: If you use Twitch on iPhone/Android, visit Twitch's official website using Google Chrome. On the page, click the three vertical dots and select Desktop site. This gives the same control of Twitch as a computer.
Step 2. Click your Profile icon, click Creator Dashboard > Settings > Stream. Under VOD Settings & Stream Rewind, toggle on Store past broadcasts. If you don't enable this feature, Twitch will not save your streams.

Step 3. Now, you can stream on Twitch, and it will auto-save your streams.
Step 4. Click on the three-line button again, and click Content > Video Producer. Now, click the Three-Dot Lines behind the video and choose to download it to your computer.
Don't forget to share this tutorial if you find it helpful!
Twitch Record Stream via VLC Media Player
😊Best for: Users who want a lightweight, free, and open-source solution to record Twitch streams without complex setup.
VLC isn't just a video player - it can stream and save Twitch videos through custom stream input. Though not beginner-friendly, it's a good option for users who are comfortable tweaking settings. Great for long-term, passive recording.
Editor's review
![]() Pros
Pros
- Completely free and ad-free
- Cross-platform
- No need for extra plugins or sign-ins
![]() Cons
Cons
- Not beginner-friendly
- May fail with some live streams due to Twitch restrictions
- No advanced scheduler or editing
🚩 How to Record a Twitch Stream with VLC:
Step 1. Install and open VLC Media Player on Windows or macOS computers.
Step 2. Open the Twitch channel and copy the stream URL.
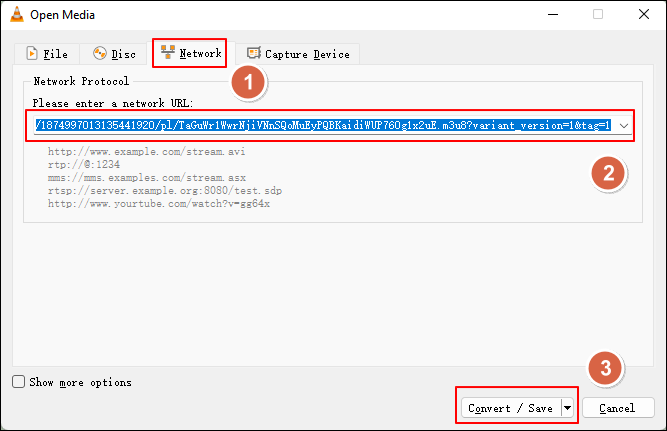
Step 3. Open VLC > Media > Open Network Stream.... Paste the Twitch stream URL. Click the drop-down next to Play and choose Convert.
Step 4. Select MP4 or another preferred format, destination, and filename for the recorded file.
Step 5. Click Start to begin. VLC will record the stream until you stop it manually.
Don't forget to share this tutorial if you find it helpful!
Tips for Recording Twitch Live Streams
Here are some tips for you to record and save your live videos smoothly in high quality:
1. Use Stable Recording Settings
Set your recording resolution and frame rate to match the stream's actual output, usually 1080p or 720p at 30–60 FPS. Higher settings can cause dropped frames without improving real quality, so stability should always come first.
2. Check Audio Before You Start
Make sure the stream audio is being captured correctly and is not muted or routed to the wrong source. A short test recording helps confirm volume, clarity, and audio sync before recording a full live stream.
3. Optimize System Performance
Close unnecessary background apps and avoid heavy downloads while recording. For long or unpredictable streams, ensure your device won't enter sleep mode or stop recording midway.
4. Save Recordings Reliably
Use common video formats and confirm you have enough local storage, especially for long sessions. A properly saved local file is essential for later viewing, editing, or archiving.
5. Respect Usage and Copyright
Recording your own Twitch streams is generally safe. When recording other streamers' content, limit usage to personal viewing or archiving unless you have permission to share or repost it.
Summary: Method Comparison Table
This guide offers 4 ways to record Twitch streams on different platforms. Here is a comparison of the three Twitch recorders:
|
Tool |
Difficulty |
Quality |
Best For |
Platform |
|
EaseUS RecExperts |
★☆☆ |
4K |
Beginners, Creators |
Win/Mac |
|
OBS Studio |
★★★ |
1080p+ |
Pro Users |
Win/Mac/Linux |
|
Twitch VOD |
★☆☆ |
4K |
Streamers themselves |
Win/Mac/Andorid/iOS |
|
VLC |
★★☆ |
Varies |
Tech Users |
Win/Mac/Linux |
Use EaseUS RecExperts to record Twitch streams with audio on your Windows/Mac computers. Always remember to follow Twitch's TOS and copyright laws.
Record Live Twitch Streams FAQs
If you want to know more about how to record on Twitch, those questions and answers may help you.
1. Can I download my Twitch streams?
Yes, you can screen record Twitch streams with some great Twitch screen recorders. Here we will take EaseUS RecExperts as an example.
Step 1. Download and open it, then choose the "Region" option and adjust the recording area.
Step 2. Click "Sound" to select the audio recording sources. After that, click "REC" to start your recording.
Step 3. Once the recording is completed, you can preview, trim, or rename the recorded video to your liking.
2. What is the highest viewed Twitch stream?
Blevins is the highest viewed Twitch stream. He still holds the record for the most-watched Twitch stream by an individual streamer after more than 600,000 viewers tuned in to watch his 2018 Fortnite battle with the rapper Drake.
3. How to save Twitch streams on iPhone?
To save your streams on Twitch on iPhone, you can follow the steps below:
Step 1. First, please log in to Twitch in your mobile browser and select "View Desktop Website".
Step 2. Click Profile > Creator Dashboard > Settings > Stream > VOD Settings & Stream Rewind to enable Store past broadcasts. Then, you can record and save your live videos on Twitch.
If you need to edit again, please use professional recording software on PC such as EaseUS RecExperts to record 1080P/4K video from the beginning.
4. How do I record a stream?
If you want to record a streaming video, try many streaming video recorder tools. If you need to record streaming audio, there are also many streaming audio recorder programs to choose from.
5. How to record Twitch streams on Xbox?
Use Xbox's built-in capture (limited to 1 - 2 min). For full Twitch stream recording, use a capture card (like Elgato), connect to PC, and record via OBS Studio or EaseUS RecExperts.
6. How to record Twitch streams on PS5/PS4?
Use the console's Share button for short recordings. For longer streams or higher quality, use a capture card and PC software like EaseUS RecExperts.
7. Can I record someone else's Twitch stream?
Technically yes, but it may infringe Twitch's guidelines or copyright. It's best to ask for permission.
8. What is the best format to save Twitch recordings?
MP4 is widely compatible and lightweight. For editing, MKV or MOV is preferred.