-
![]()
Daisy
Daisy is the Senior editor of the writing team for EaseUS. She has been working in EaseUS for over ten years, starting from a technical writer to a team leader of the content group. As a professional author for over 10 years, she writes a lot to help people overcome their tech troubles.…Read full bio -
Jane is an experienced editor for EaseUS focused on tech blog writing. Familiar with all kinds of video editing and screen recording software on the market, she specializes in composing posts about recording and editing videos. All the topics she chooses …Read full bio
-
![]()
Melissa Lee
Alin is an experienced technical blog writing editor. She knows the information about screen recording software on the market, and is also familiar with data cloning and data backup software. She is expert in writing posts about these products, aiming at providing users with effective solutions.…Read full bio -
Jean is recognized as one of the most professional writers in EaseUS. She has kept improving her writing skills over the past 10 years and helped millions of her readers solve their tech problems on PC, Mac, and iOS devices.…Read full bio
-
![]()
Jerry
Jerry is a fan of science and technology, aiming to make readers' tech life easy and enjoyable. He loves exploring new technologies and writing technical how-to tips. All the topics he chooses aim to offer users more instructive information.…Read full bio -
Larissa has rich experience in writing technical articles. After joining EaseUS, she frantically learned about data recovery, disk partitioning, data backup, screen recorder, disk clone, and other related knowledge. Now she is able to master the relevant content proficiently and write effective step-by-step guides on various computer issues.…Read full bio
-
![]()
Rel
Rel has always maintained a strong curiosity about the computer field and is committed to the research of the most efficient and practical computer problem solutions.…Read full bio -
![]()
Gemma
Gemma is member of EaseUS team and has been committed to creating valuable content in fields about file recovery, partition management, and data backup etc. for many years. She loves to help users solve various types of computer related issues.…Read full bio
Page Table of Contents
Jean
Updated on Jul 03, 2024
0 Views |
0 min read
PAGE CONTENT:
No doubt, screen recording is beneficial for capturing and sharing your presentations. But it becomes useless if you are unaware of when and how to stop the recording at the right time. So, you must stop recording your PowerPoint presentation to avoid capturing unnecessary parts. But how?
To facilitate you, this post discusses how to stop screen recording on PowerPoint in the proper manner. Also, you will learn about enabling the recording tab in PowerPoint if it's not available in the navigation bar, along with the free video recording software!
How to Disable Screen Recording on PowerPoint
Screen recording is a robust feature of Microsoft PowerPoint to record presentations as a video file. You can effortlessly create & save a video of your presentation for future playback on both Windows and macOS systems. Although the recording audio feature is available, you must ensure the audio is clear and the microphone works correctly.
Using this screen and audio recorder, you can efficiently share your presentations with clients and colleagues. However, you can also use this feature for personal tasks.
Let's comply with the given steps on how to end screen recording on PowerPoint:
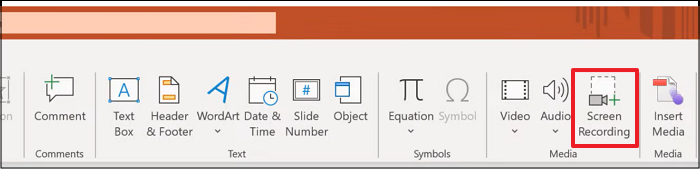
Step 1. The first step involves launching the PowerPoint app on your system and opening the existing presentation or starting a new one from scratch. Now, you have to expand the "Insert" tab from the main menu and look at the "Media" section to tap the "Screen Recording" button.
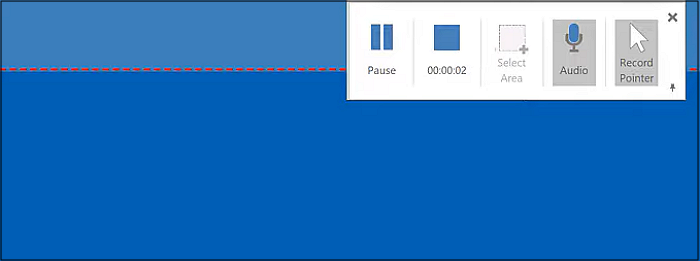
Step 2. Next, you have to press "Select Area" to choose the required region for recording. Also, tap the "Audio" and "Record Pointer" options if needed.

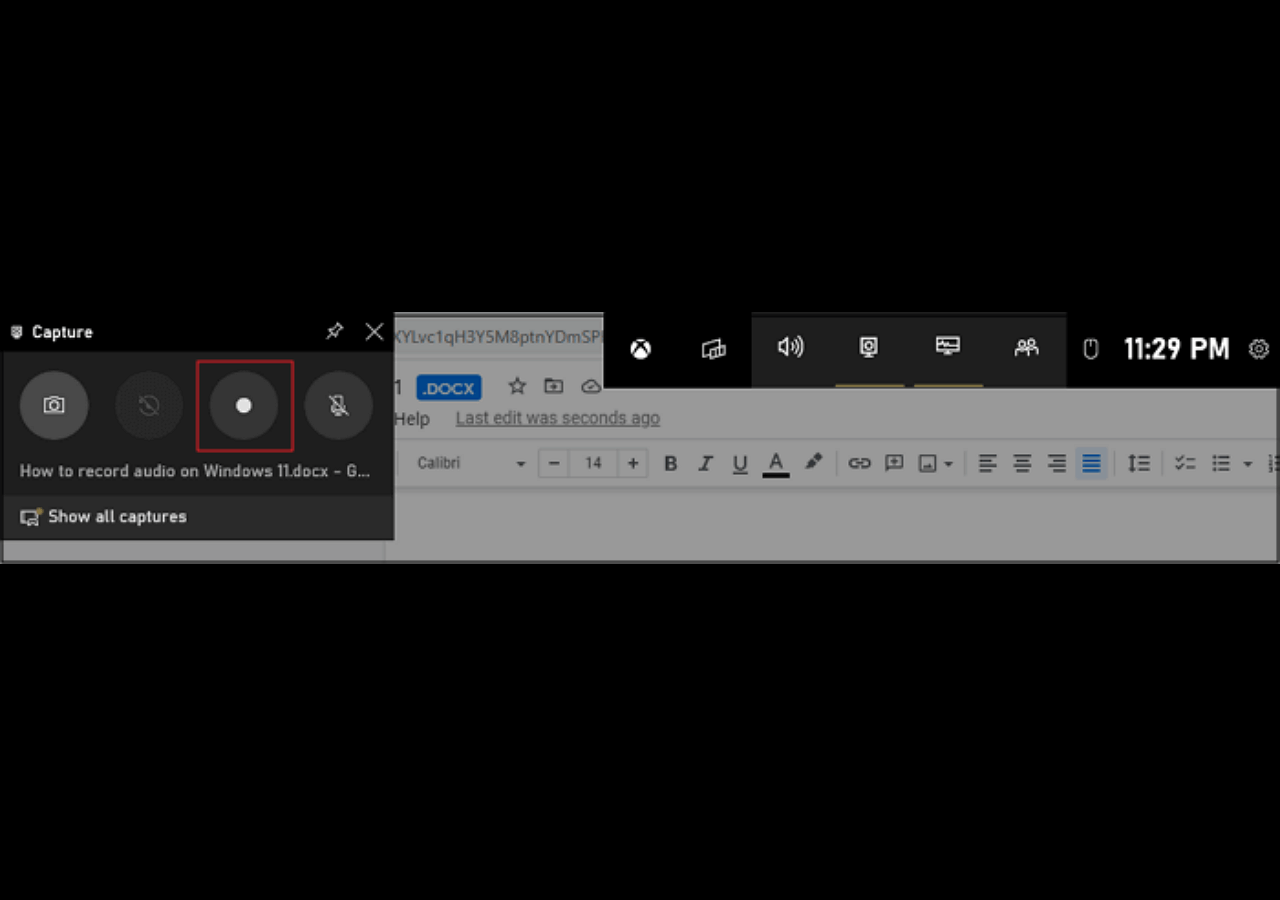
Step 3. Lastly, hit the red "Record" tab to start recording, and once done, hit the blue rectangle button showing the recording duration. Right-click the PowerPoint slide and choose "Save Media As" to export the recording. That's all!
People also read:
How to Enable Recording Tab in PowerPoint
Sometimes, the users may not find the screen recording feature on the navigation bar. Also, they might face the problem of PowerPoint screen recording not working. Whatever the case, you must enable the recording tab before you begin to create a screen recording in PowerPoint. Customizing the ribbon is the only option to assist you in this situation.
Here is how to enable the Recording tab in PowerPoint.
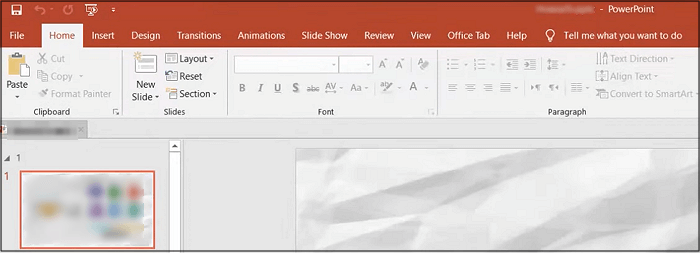
Step 1. First of all, you have to open the PowerPoint app on your computer. Now, press the "File" tab from the main toolbar.
Step 2. Secondly, choose the "Options" tab from the available list that will open the popup window of "PowerPoint Options." Next, go to the "Customize Ribbon" tab.
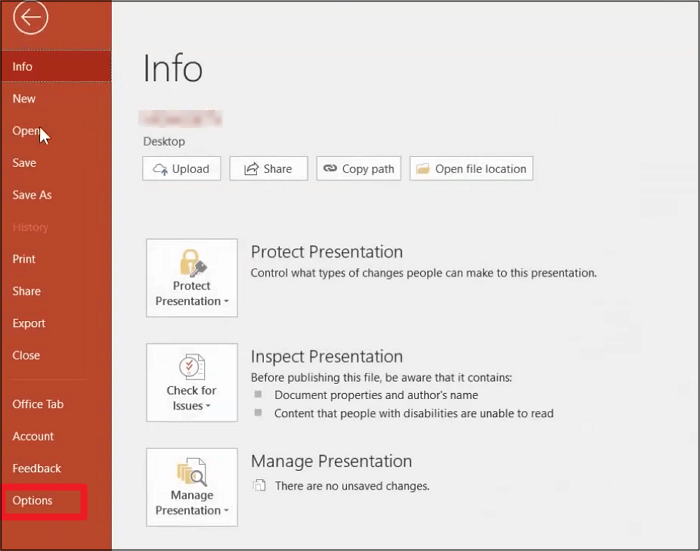
Step 3. Lastly, check various options under the "Main Tabs.". You must checkmark the "Recording" box and hit the "OK" button. You are all done!

Now, you can screen record on Mac and Windows without hassle. However, there is a demand for a third-party screen recorder for advanced functionalities.
Or you can watch this video tutorial from YouTube.
Bonus Tip: A Better Screen Recorder - EaseUS RecExperts
- 😃Rating: 4.9 out of 5 stars (⭐⭐⭐⭐)
- 💻Compatibility: Windows 7/8/8.1/10/11 (32-bit & 64-bit), macOS 10.13 or later
Though PowerPoint offers a built-in feature for screen recording, it may not satisfy your professional needs. So, using full-fledged screen recording software is necessary if you need high-quality video recording without effort. Here, EaseUS RecExperts comes in handy.
This unlimited screen recorder helps you flexibly record the full screen or part of the screen. You can effortlessly record video from a webcam and capture multiple screens simultaneously. Even recording the screen with audio is in your control. This full-screen recorder helps you record audio from YouTube, the system sound, and the microphone voice. You won't have to face any lag or time limit.
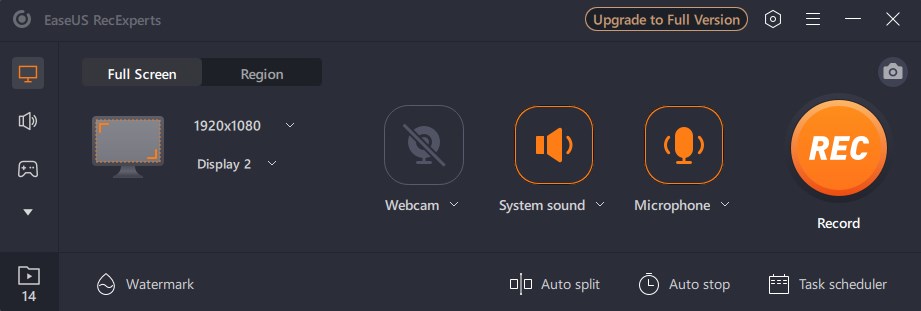
In addition, it lets you schedule the recording by setting the start time and the duration. Even you can annotate your recordings while processing. Also, this best free screen recorder offers a default media player to preview the recordings. Later, you can use the editing toolkit for your recordings to trim, compress, extract audio, adjust playback, and more.
🔖Features
- Support up to 13 input and output formats
- Let you record internal audio on Mac & Windows
- Provide the auto stop and auto split function
- Offer quick player access for lossless playback
- Help you enhance your videos up to 4K or 8K
"EaseUS RecExperts is an easy-to-use screen recording software with a lot of features to offer. This recording tool can capture audio and webcam video in addition to what's happening on your screen. We also liked that it offers scheduled recordings and an auto-stop function." - From TechRadar
EaseUS RecExperts is the best for screen recording not only on PowerPoint but other apps as well. Don't miss it. So, let's download it to explore its unique features. If you do not want to download any software, you can also use its online screen recorder.
You can share this post with others to let more people know about EaseUS RecExperts.
Conclusion
After going through the above guide, you must have learned how to stop screen recording on PowerPoint. Also, making the recording feature appear in the navigation bar becomes a piece of cake. But for advanced functionalities and high-quality output, you must use a comprehensive unlimited screen recorder like EaseUS RecExperts.
This safe and secure recording software offers a range of unique features, assisting you in effortless and quick processing. So, let's download it and try it once!
Download EaseUS Screen Recorder
Download EaseUS Screen Recorder
Trustpilot Rating 4.7
How to End Screen Recording on PowerPoint FAQs
Besides considering the above discussion on how to stop screen recording on PowerPoint, you can look at the questions below for more information:
1. How do I stop my computer from recording my screen?
To disable your Mac from recording the screen:
Step 1. After choosing the Apple menu, press the System Settings tab.
Step 2. Go to the Privacy & Security tab from the sidebar and select Screen Recording.
Step 3. Turn the Screen Recording off for the desired app.
2. How do I edit a screen recording in PowerPoint?
To edit PowerPoint screen recording:
Step 1. Once you are done with the screen recording on PowerPoint, right-click the video.
Step 2. From Style, Trim, and Start options, you can choose your frame style, cut the video, and adjust the playback settings.
Step 3. Lastly, right-click the video and select Save Media As to export the recorded video.
3. Where does PowerPoint save screen recording?
PowerPoint usually saves the screen recordings as a video in the default location of your computer, such as the Documents and Movies folder. However, you can also save the recording as a separate file in the desired folder.
EaseUS RecExperts

One-click to capture anything on screen!
No Time Limit, No watermark
Start Recording